Sunday 22 June 2014

Getting Creative with Microsoft Word

Back up the Quick Access Toolbar
Quick Access toolbar (QAT) is very handy and useful part of MS Word 2010 onwards. The basic version of it is very straight foward however you can customise it to your need as I had demonstrated in my previous blog of how to add calculator to your QAT in Excel.  So you've spent a great deal of time customising QAT, it's all too easy to forget about it as we assume that it is always there. What if for some reason you ever need to reinstall Windows. Thankfully, you can create a backup of the toolbar, which means it can be brought back without any hassle, or copied to other machines that you work with.

In Windows XP (I know some people still use it); use Explorer to navigate to 
'C:\Documents and Settings\[username]\Local Settings\Application Data\ Microsoft\Office'

While in Windows Vista or 7, you should head to
 'C:\Users\[username]\ AppData\Local\Microsoft\ Office'.

Here you'll find a file called 'Word.qat' – this can be duplicated for backup purposes, or copied to another computer. Once you have reinstalled Windows and Microsoft applications, just copy this file back to it's original destination. If a file of similar name exist, Windows will prompt you to overwrite. Click Replace to overwrite the file. You have all your settings for QAT back. Easy!


Smartly Using SmartArt in Word
A SmartArt graphic is a nice way to visually communicate information instead of plain text. However if you first create a SmartArt and then type in your contents it is quite painful.  
Word gives you the flexibility to type in your contents first and paste it directly into SmartArt and it will do the formatting. Well, the basic rule for any documentation is to first type your contents and later proceed with formatting. 
Bullet points without SmartArt

Bullet points in SmartArt
Let us see how we can do it. I am assuming here that you know how to create bullet points with sub-points, so I will not go into the details of it. 

Step 1
In a Word document (obviously) type in your contents. Select the text and click to create bullets. To create a sub-point click at the beginning of that line and hit "Tab" key once. 
This is what I have done for our example. 
Select your text and press Ctrl+C to copy it to clipboard.

Step 2
Click on "Insert" on the top ribbon and click SmartArt. 
Note: Ensure your text is not selected while inserting SmartArt otherwise your text will be replaced by SmartArt.
Insert -- SmartArt
Select your desired SmartArt you would like to create, for our example I have picked Vertical Box List.
SmartArt options
Step 3
Select the Smart you have just placed and on the left of your SmartArt you will see a flyout button, click it. Alternatively click on the SmartArt Tools on the top of the ribbon menu and select "Text Pane".

Activate Text Pane for your SmartArt
Step 4
A text pane will appear on the left of your SmartArt. Click within and press Ctrl+V to paste your bullet text you had copied to clipboard in Step 1. Delete any extra blank points you have in the Text Pane. Your SmartArt already displays all your text. Once you achieve your desired result, close the Text Pane by clicking the cross (x) next to where it says "Type your text here". To modify/edit your text all you have to do is repeat Step 3.
Paste your text in Text Pane
Step 5
You can change the style and colour of your SmartArt by selecting it and clicking on the SmartArt Tool ribbon on the top. 


Format your SmartArt

You can even modify individual components of your SmartArt. For Example, I wanted to changed the colour of "Apples" tab. Click the component until you see only that particular selected. Right-Click it and select Format Shape.
Modify SmartArt

I changed the colours to match the fruit colours. This was the final result.
Final Result

I hope you have learned something new today. You can copy and paste it in your PowerPoint presentations, the use is endless. 

Remember Compute, Create, Cook is all about learning something new and sharing. So until next time... Happy Computing!

Saturday 21 June 2014

Cheesy Savoury Muffin

The word Muffin always sounds so synonym with sweet. Well my favourite muffin is walnut and coffee muffin and how can I forget Orange and Poppy seed muffin...ymmm yum!! 
When my daughter started Kindergarten this year she had a big lifestyle change. In preschool lunch was prepared and served, however with school as you know, you have to carry your own lunch box. For me it was a bigger lifestyle change with a question of what can I give her which is easy to eat, can be eaten cold without getting stale or off. Like any other 5 year old kid she is a fussy eater. I always thought of muffins however I did not wanted to give her the sugary version. 
During my school days, back home in India; I remember my mom used to give me what is known as "Muthiya". It was a mixture of couple of flours with shredded vegetables, spices and was steamed. She would pack it with mango chutney or simple tomato sauce. I wanted to make something similar in a baked version and I came across this recipe in one of the food magazine in a coffee shop. The only variation I have done is I replaced butter with olive oil and add Havarti cheese. Havarti is a Danish Cow's milk cheese with a mellow buttery taste. It can be eaten on it's own, throw a slice on a sandwich, grill it, bake it like I did and or melt it on pizza's or cheesy toast. I actually enjoy it with a glass of Cabernet Merlot...... *wink...wink!!

Ok, coming back to my savoury muffin, the first bite she took was not a huge success, however packed in a lunch box with no other option given to eat she enjoyed it. Even my boys loved it and you will see below how it was served at home. :-D

Cheesy Savoury Muffin

Ingredients
  • 2 cups of Self Raising flour (If you can't find self raising flour just add 2 teaspoon of Baking Soda to 1 cup of plain flour)
  • 1 Zucchini finely grated
  • 1 Carrot finely grated
  • 1/2 cup of shredded Tasty Cheese (cheddar cheese)
  • 1/4 cup of shredded Havarti Cheese 
  • 1/3 cup Olive oil 
  • 1/3 cup of Fruit Chutney (If you can't find fruit chutney you can use tomato sauce)
  • 1/2 cup of milk
  • Salt to taste


Method

  • Pre-heat your oven to 180 degree C.
  • Grate Zucchini and carrot and squeeze all water out if it.


Self Raising flour, fruit chutney and cheese

Zucchini and Carrot - Grated
  • Mix all the ingredients in a large bowl. When you add milk, make sure that it is not a runny consistency. 
Mix all Ingredients

All ingredients mixed
  • Line the muffin tray with muffin cups and fill each cups only half way through. When baked, this will rise therefore to ensure it has enough space we do not fill it right to the top.
Ready to Bake
  • Bake until it is thoroughly cooked. To check use a wooden barbecue skewer and poke right through one of the muffin. If the skewer comes clean your muffin is ready. This usually takes around 20mins. Time may vary depending on your oven.
  • Let it cool down in the tray first and transfer the muffins on the wire rack. Do not get tempted to eat it. The content inside can be very very hot because of cheese and secondly it might taste a bit doughy. 
  • Once it has cooled down you can store it in an airtight plastic container in a fridge for 3-4 days. 
  • You can serve it on it's own, or top it with whipped cream.
Topped with Whipped cream
Do not expect this muffin to be as fluffy as the sweet version. One reason is we have not added any egg and secondly cheese makes the density of the muffin a bit heavy and it will not rise and become fluffy compared to the sweet version, however it taste really good. You can spice it up a little bit by adding herbs of your choice and chilli flakes. Do not limit yourself to only Zucchini and carrots. You can even add peas, corn, sweet potatoes, spinach, spring onions etc. Be imaginative. 

Let me know how did you go and if you tried any variation to the above recipe. Remember Compute, Create, Cook is all about learning something new and sharing. So until next time... Happy Cooking!


Saturday 14 June 2014

Spinach Ricotta Feta Cheese Tart

Hmmm...yummm. My wife and I we both love the taste of Feta. It is a crumbly, salty treat and you have to be careful while using it because the taste can be very overpowering. This is a lovely treat for dinner with nice watercress, rocket and baby spinach salad and couple of slices of steamed beetroot. For kids it is a wonderful option for school lunch box. When I cooked this, my kids didn't enjoy the salty taste of Feta so I had to prepare a second round substituting Feta with Cheddar Cheese (all time favourite with kids). This a low fat healthy meal option and nice way to make kids eat spinach. I came across this recipe while I was flying Singapore Airlines from Sydney to Singapore with my 5 year old daughter. It was a part of special Child's meal. When it was served it looked more like quiche. I am calling it a tart because the like quiche the pastry sheet does not cover the sides in my recipe. 
So without wasting any time let us see what you will need to make this lovely dish. 

Spinach Ricotta Feta Cheese Tart

Ingredients

  • 1 Shortcrust Pastry sheet
  • 3 Eggs
  • 1 Cup of fresh Ricotta Cheese
  • 1/4 Cup of roughly crumbled Feta cheese (or 1/2 cup of grated Cheddar Cheese)
  • 1 Tablespoon Parmigiano-Reggiano or better known as Parmesan in English
  • 1/4 Cup chopped spinach ( I had used the frozen one)
  • Salt and Pepper to taste
  • Springform Cake Tin


Method

  • Thaw a shortcrust pastry sheet at room temperature. 
  • I will be using Springform cake tin. This is nice cake tin with a spring lock on the side. You snap it open and the base of the tin comes out. 
Springform Cake Tin
  • Using the round base of the tin, with a paring knife cut the pastry sheet in a round shape as shown below. Keep some extra margin along the circumference of the base while cutting.
Cut the pastry sheet. 
  • Pre-heat your oven at 180 degree C. These tins are usually non-stick so you don't have to use baking paper or grease. Line the sheet on the base of the tin and lock the base. Bake the sheet for not more than 7-10 mins. 
Bake the shortcrust pastry sheet
  • In a large bowl crack 3 eggs and beat it well with an egg beat until it is pale and frothy.


3 Eggs


Beat the eggs until pale and frothy


  • Add spinach, ricotta, feta or Cheddar (depending on which one you are making), parmesan, salt and pepper and mix well. Please be very careful with salt if you are using Feta cheese. Mix all the ingredients lightly.
Cheese, spinach and egg mixture

  • In the mean time, your pastry sheet should partially cooked. Take out the tin and top it with this egg mixture.

Ready to bake
  • Bake it for 30mins or until the top of the tart is golden brown and set.
Spinach Ricotta Tart
  • Let it cool down slightly and then run the knife around the edge of the tart. Once it is totally cooled down, open the springform tin and cut the tart according to your serves. 
Serve the tart
  • Serve the tart with some nice salad and steamed beetroots. 
Spinach Ricotta Feta Tart
I hope you will enjoy it. You can store it in fridge for 2-3 days. It can be eaten warm or cold doesn't matter.  Let me know how did you go.

Remember Compute, Create, Cook is all about learning something new and sharing. So until next time... Happy Computing!


Creating 3D Image with PowerPoint

Hello again!
I have already touched computing and cooking in my previous two blogs. Today let us talk about creating something. 
I always believe that creativity is not limited to expensive tools or software, however it is limited to your imagination. As a graphic designer I use Photoshop, Illustrator, CorelDraw and similar applications in my work, however I always used to think, should someone be really using such expensive software for their everyday needs? What about those who do not have such expensive software and/or does not know how to use it but would like to wow their audience with some creative presentations or pictures. I found this functionality in PowerPoint. 

Part of MS Office Suite, PowerPoint 2010 and onwards have some very powerful tools, the question is you should know how and when to use it.  So I got an idea of creating 3D image; relax....you will not need 3D glasses to view this image. What we are going to create is an image which appears like part of the subject is popping out. Something like this:
3D image in PowerPoint
Ok, let us straight jump into it .This time I have created a video of how to do it. 


Remember you do have an option of exporting slides as images PNG, JPG etc. So go a select your picture, create it, print it and wow your family and friends.

Enjoy it and let me know if you found it useful.

Remember Compute, Create, Cook is all about learning something new and sharing. So until next time... Happy Creating!


Sunday 8 June 2014

Kids Special - Peek-a-boo Breakfast

A note of caution: Cooking is an art of Chemistry, it can be fun if you can involve your kids. However kids are vulnerable when it comes to sharp objects and hot items. It is your duty to ensure their safety. If you are not confident about it, do not involve your child.

When I first uttered this name, my 5 year old daughter gave me a look :-O. “Dad, what is that” she asked and I could see the hidden enthusiasm in her eyes. I said “Do you want to help daddy make this lovely new breakfast, then go and get your chair!” She usually wants to help me in the weekend cooking; as the bench top is a little too high for her she will go and get her little chair to stand on. My twin boys 2 ½ years old were as usual watching and grooving to Wiggles songs on TV… “Do the monkey..hoo..hoo..ha..ha..”. While she disappeared in the rumpus room to get her chair, my soliloquy was in response to her question, “Things daddy has to do to interest you all in food”. 
Many of you will agree with me that it is really hard to get kids to eat when all they are interested is fun…fun and more fun!! I still remember, I myself was a very fussy eater and my parents had hard time making me eat. One game I recollect they used to play; called “Thief in the plate”.  My dad would put a morsel aside and would close his eyes and I was the thief who would steal this morsel and eat it before he opened his eyes…it was fun-n-game for me and for them it was a relief that I had my supply of energy. Now it is my turn to play dad!

So every weekend mornings, during breakfast time I could see a question mark floating around my head. Anything special before they start wasting their energy??  I came across this recipe of  egg in a bread with tons of American Cheese!. I didn't wanted to make it too cheesy and loaded with fat, so I improvised the original recipe. One thing every Australian child love is Fairy Bread! A buttered slice of bread with coloured sugar sprinkles on it. I combined these two recipes and gave a funky name. My kids love it and ever so often they enjoy this weekend Peek-a-boo Breakfast. 

Here is the recipe....

Peek-a-boo Breakfast

What  you will Need

  • ·         1 slice of bread. Thicker the better.
  • ·         1 egg
  • ·         butter
  • ·         Pinch of salt and pepper
  • ·         Handful of cake sprinkles (hang on…don’t make faces, I will tell)
  • ·         A small round cookie cutter or milk bottle cap will do. There is no big rule for the shape of the cutter as long as you have enough bread to eat.
 What you need?
Cut the bread using the cutter as shown above. Do not discard the round piece which you had just cut, keep it aside.  Butter the whole bread on one side as well as lightly grease the non-stick pan and place the bread butter side down. Do not put it on the heat as of yet, if you want your child to get involved. It is better for them to touch a cold pan, than a hot one!

Now hold the egg horizontally over a bowl and get your child to crack it with the back of a spoon. Teach them to hit it just perfect, even if you have to waste an egg…it is worth it! Because it is all about enjoying time with your kids, getting them interested in food and in turn teaching them the art of cooking.  Now slowly drop the egg in the centre of the  bread as shown below.
Egg in the hole!


Cook the egg on a low-medium temperature. The egg will get cooked bottom up, once you see it is cooked, flip the bread slowly and cook on the other side. Make sure before you flip you apply little butter on the top and lightly garnish with salt and pepper.


Remember that piece of bread which I asked you earlier to keep it aside? Hope it was not eaten or thrown away?? While the other side of the egg is getting cooked, butter the round piece of bread and sprinkle it cake sprinkles. 

Preparing Fairy Bread
The Round Fairy Bread


Your egg-toast should be ready by now. Serve on a plate with the fairy bread partially covering the egg. You can tell that the egg is hiding in the bread - Peek-a-boo! 
My kids ate it all obviously the fairy bread part was devoured first :-)

Peek-a-boo!
It is a very wholesome breakfast. For the adult version, you can skip the fairy bread if you are not a sweet tooth I like a bit spicy and garnish my egg with a pinch of extra pepper and red chilli flakes. This eggsotic breakfast is protein loaded and if your child loves multigrain bread you are fortifying it with other good stuff.  Kids are happy, we are happy!

Another variation as suggested by my daughter. Using tomato sauce to draw a Mickey Mouse face!


Remember Compute, Create, Cook is all about learning something new and sharing. So until next time... Happy Cooking!


Saturday 7 June 2014

Microsoft Excel Tips and Tricks - Calculator

When it comes to Excel many people make faces. In fact even I used to make faces. However as it is said, "Necessity is the mother of all inventions", it became so that my work life was in and around Excel. This gave me an advantage to learn a few good tricks in Excel.Let me tell you, Microsoft Excel has come a long way and has developed into very powerful tool. From simple tables to complex database it can do a lot. 

For now just a simple trick which works well in Microsoft Excel 2010 and onwards.

If you are a person who loves to use Windows calculator while using Excel this will come definitely handy.

Adding Calculator Button to Quick Access Toolbar
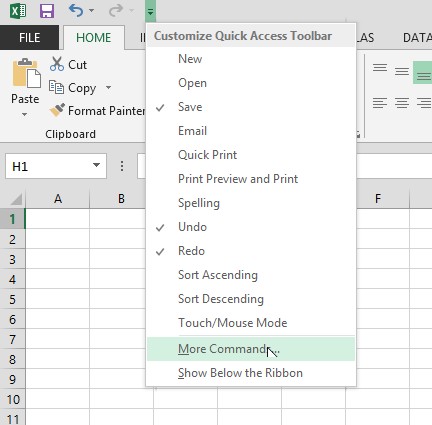
Navigate and click the down button at the end of the Quick Access toolbar and click More Commands as shown below.
Image of Quick Access Toolbar
Quick Access Toolbar

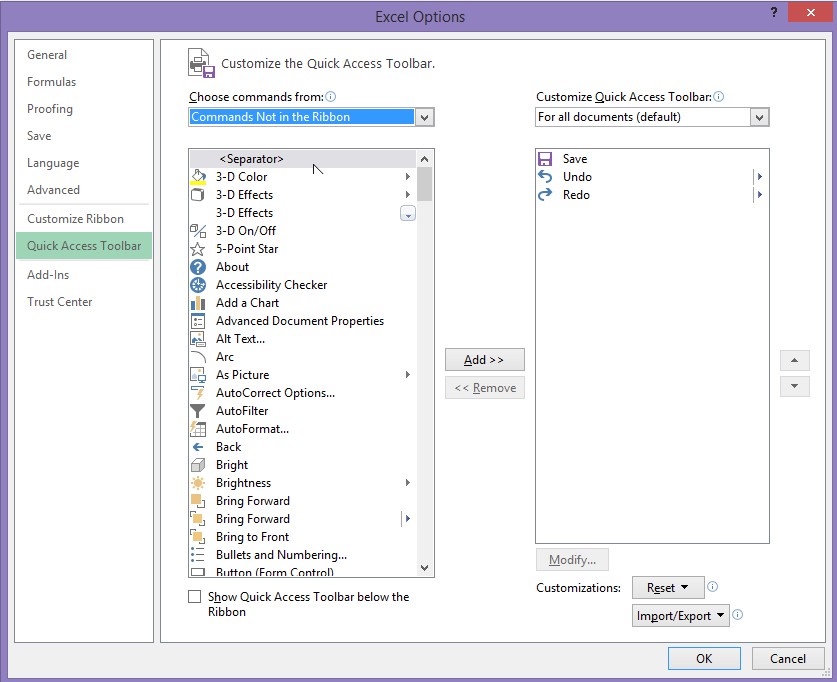
This will take you to customise your Quick Access Toolbar. From the box on the top "Choose Commands from" select, "Commands not in the ribbon" as shown below.
Customise Quick Access Toolbar
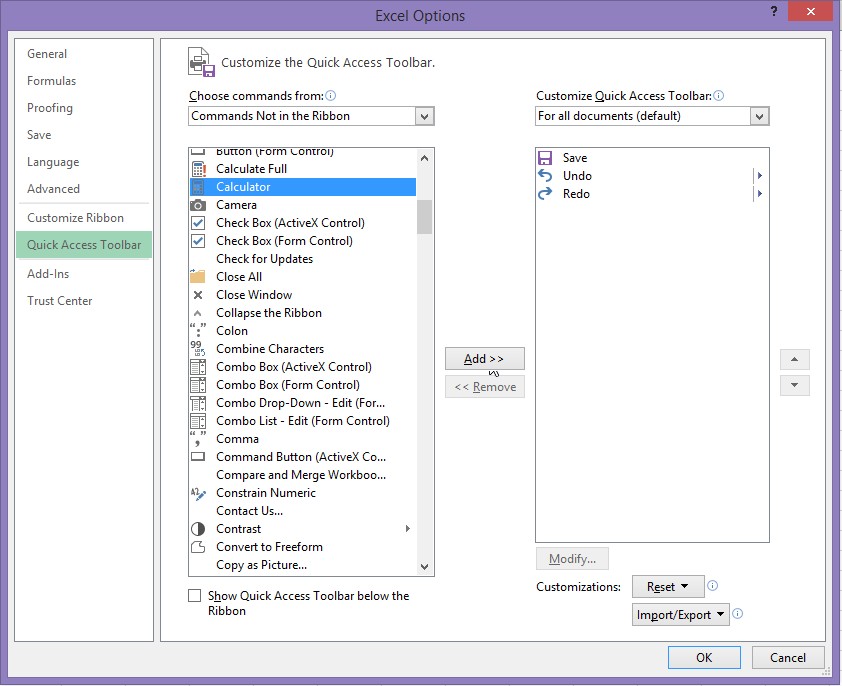
From the list, scroll down until you see "Calculator". Select it and then click on Add button. Now click Ok as shown below.
Adding Calculator to Ribbon
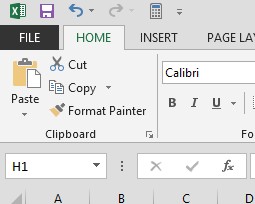
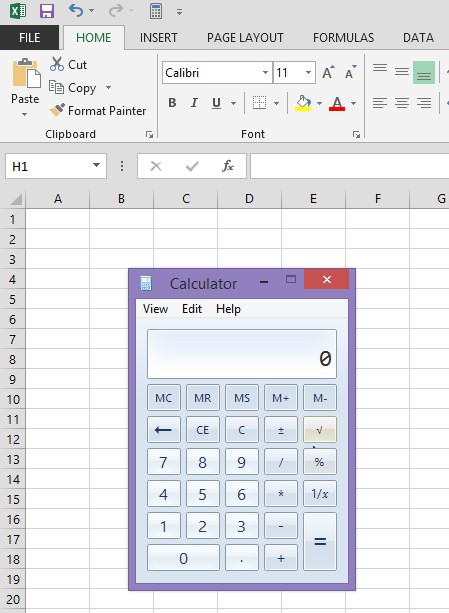
Bingo! There you have it, Calculator button in the Quick Access Toolbar ribbon. So now when you are working with figures in Excel and would like  a quick calculation, you don't have to go and find your physical calculator, phone or go looking for Calculator application from Start Menu. You have right at your finger tips. 
Calculator in Quick Access toolbar 
Activated Calculator


I hope you found this tip useful. Keep checking my blog for more computing tips and tricks. If you like to know something, please put in your request in the comment section and I will answer your query in my future blogs. 

Remember Compute, Create, Cook is all about learning something new and sharing. So until next time... Happy Computing!

Tuesday 3 June 2014

Compute Create Cook

What is it all about? 

Well for me it is 3Cs, my passion. My passion with computers, my passion with graphic and web designing and my passion for cooking. I always wanted to combine these three into one single domain and hence we have my blog - "Compute Create Cook"!!

Now I am fairly new to blogs in spite of being very computer savvy so I was not sure where to start but here I am penning (or keying) down my thoughts as I go. I have my own website which I am currently building  using Adobe Tools like Illustrator, Muse, Photoshop etc, however I wasn't sure where will I start so I resorted to Blogger.

Well I will not bore you more with yada....yada..yada...yada.. Instead let us come down to what is going to happen here as I learn how to blog.

You will be mostly seeing the following tips, tricks, ideas and views:

Computing tips, tricks, troubleshooting and guides.

I will share some of my graphic designing work, tips and tricks I have learned or hurdles I have encountered using various software.

Lastly but not the least recipes, which I have learned from others, watched videos on YouTube and experimented it, tweaked and re-created to tickle the taste buds of my family and friends. All those who know me; I have 3 kids all under 5 and I, being the Cook and the Chef of my house have always struggled with nagging question what next to make my kids eat!?!